Views: 0 Author: Site Editor Publish Time: 2026-06-10 Origin: Site


A compromised wiper system presents an immediate safety risk on the road. It also triggers severe compliance issues for commercial vehicles. Complete vehicle downtime impacts operations heavily during bad weather. Drivers demand perfect visibility during heavy rain or snow. Unfortunately, prematurely replacing the wiper motor remains a common mistake. Technicians often blame the motor when the mechanical assembly actually failed. This expensive diagnostic trap wastes both parts and labor hours.
You need reliable methods to identify the exact point of failure quickly. We designed this guide to provide a clear troubleshooting framework. It will help you isolate mechanical faults from electrical issues accurately. You will learn how to perform precise evaluations step by step. We also outline cost-effective repair decisions to ensure long-term vehicle reliability.
Isolate the Fault: Grinding noises or out-of-sync wipers usually indicate a mechanical linkage failure, whereas total unresponsiveness often points to the motor or electrical relays.
Check the Basics First: A single non-functioning wiper is frequently caused by a loose retaining nut rather than a total linkage collapse.
Evaluate Component Wear: Degraded plastic bushings at the pivot points are the primary failure mechanism in standard linkages.
Upgrade for Longevity: For fleet or high-stress environments, evaluating replacement parts with heavy duty materials and enhanced corrosion resistance minimizes future downtime.
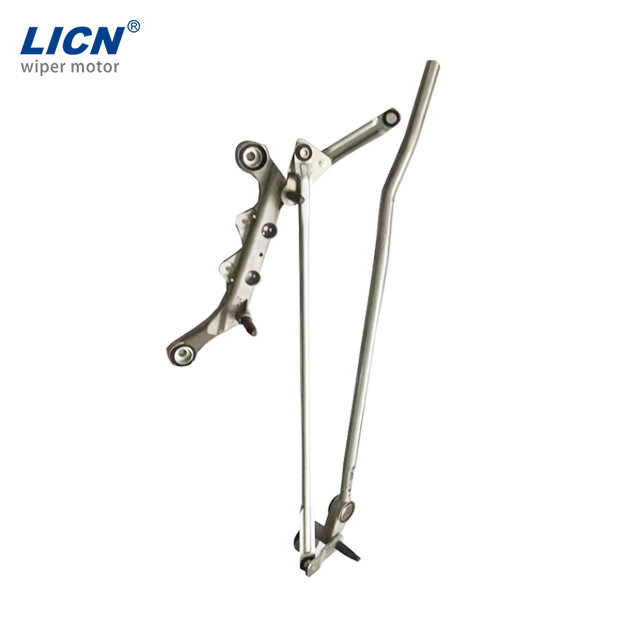
We must define how these parts interact beneath the cowl panel. The motor generates raw rotational power. The Wiper Linkage distributes this mechanical power directly to the wiper arms. Think of the motor as the engine. The mechanical assembly acts as the transmission. It converts continuous rotational energy into a back-and-forth sweeping motion. Both components must work perfectly in tandem for clear visibility.
A typical transmission assembly includes central push rods, pivot joints, and mounting brackets. The motor connects to a primary crank arm. As this crank arm spins, it pushes and pulls the connecting rods. The rods then rotate the pivot shafts. Finally, the pivot shafts swing the external wiper arms across your windshield.
You will frequently encounter overlapping symptoms in the repair bay. A seized joint often mimics a completely dead motor. Rust or accumulated debris binds the moving mechanism. The motor then tries to turn but cannot move the rigid arms. This extreme resistance blows the main system fuse instantly. It can also cause the internal motor coils to overheat rapidly. The thermal cutoff switch then engages to prevent electrical fires.
A technician sees a non-functioning motor and assumes an electrical fault. They test the power wire, find no voltage, and blame the relay. In reality, the mechanical joints seized first. The electrical system merely protected itself from the mechanical jam.
Misdiagnosis carries a heavy financial penalty. You waste valuable capital buying unnecessary motors. You waste precious labor hours installing them. The real underlying problem remains entirely untouched. The brand new motor will also fail or blow fuses if joints remain severely bound. We must avoid this frustrating cycle. Properly identifying the root cause saves money immediately. Accurate diagnosis prevents repeated repair bay visits and keeps vehicles moving safely.
One arm moves normally across the glass. The other arm stays completely stationary or jerks around erratically. This symptom points directly to a disconnected internal joint. The central motor still drives the main rod successfully. However, the connection to the secondary pivot shaft has snapped. The plastic bushing holding the ball joint likely deteriorated and popped out. This isolates the motion to just one side of your windshield.
Turn your vehicle off completely. Walk up to the windshield and grab the wiper arms. Try to move them back and forth manually. You should feel firm, immediate resistance from the motor. Significant slack indicates a severe mechanical problem. The internal plastic bushings have worn away over time. This excessive free play causes sloppy wiping patterns during heavy rain.
Listen closely from inside the cabin during operation. You might hear popping, clunking, or grinding noises. These specific sounds originate from beneath the plastic cowl panel. They indicate badly worn bushings or harsh metal-on-metal contact. The protective plastic inserts degrade naturally over years of use. The bare steel joints then scrape aggressively against each other.
The arms might collide violently during a rainstorm. They might also fail to return to their designated park position at the bottom. The mechanical timing is completely ruined. A slightly bent push rod changes the entire sweep geometry. You must fix this alignment issue quickly. Ignoring it ensures the arms will eventually destroy each other.
Observed Symptom | Probable Root Cause | Required Action |
|---|---|---|
Only one arm moves | Popped ball joint or loose nut | Inspect pivot connection & splines |
Grinding / Clunking noise | Worn plastic bushings | Inspect joints for free play |
Arms collide midway | Bent central rod | Check rod straightness |
Dead system, blows fuses | Seized pivot joints or bad motor | Disconnect motor to isolate fault |
Start your evaluation with the simplest possible fix. Pry off the small plastic cap at the base of the stationary arm. Check the central retaining nut carefully. Verify it is torqued securely to the manufacturer specification. A loose nut perfectly mimics a catastrophic mechanical failure. The motor turns the pivot shaft, but the loose arm slips. A stripped internal arm spline also causes identical symptoms. Perform this quick check before removing any complex body panels.
You must expose the entire transmission assembly next. Open the hood securely. Remove the plastic cowl panel located at the base of the windshield. Carefully detach the weather stripping holding it down. Use a bright flashlight to inspect the exposed mechanism. Look for obvious visible disconnects at the main ball joints. Search for severe rust accumulation around the pivot shafts. Check for distinctly bent rods caused by heavy snow loads.
You need to separate the electrical system from the mechanical system. This step guarantees flawless troubleshooting results.
Disconnect the Motor: Unbolt the primary crank arm from the main motor shaft. Leave the electrical plug connected.
Activate the Motor: Turn the ignition on. Turn the dashboard wiper switch to the low setting. Watch the bare motor shaft. It should spin freely, quietly, and consistently. If it spins normally, your electrical system works perfectly. The problem lies elsewhere.
Manually Actuate the Mechanism: Grab the disconnected push rods. Manually slide them back and forth. The mechanism should move smoothly without extreme effort. If it feels difficult to push, the pivot shafts are seized. If it binds halfway or exhibits extreme slop at the joints, the mechanical assembly is faulty.
Assess the bushing materials carefully before purchasing new parts. Standard OEM units rely heavily on basic plastic components. Plastic degrades rapidly under intense UV exposure. It also becomes brittle and cracks during extreme winter temperatures. This constant thermal degradation leads to inevitable failure. The grease dries out, the plastic shatters, and the joint pops loose. You must consider the operating environment.
Commercial fleets and service vehicles demand far better reliability. You should evaluate options featuring reinforced pivot joints. Look for premium brass inserts instead of standard plastic bushings. Thicker gauge steel rods prevent bending under heavy snow or ice loads. Upgrading to a heavy duty variant minimizes future breakdowns. It keeps your service vehicles operating safely during the worst weather conditions.
You have two distinct repair paths available. You can purchase a cheap kit to press new bushings into the old frame. This saves initial part costs but dramatically increases labor hours. It requires specialized clamps and significant effort. Furthermore, the old steel frame might already be slightly bent. We strongly recommend installing a completely new assembly. A factory-fresh, pre-calibrated unit ensures perfect sweep geometry. A full replacement saves valuable time and guarantees reliable long-term performance.
Feature | Standard OEM Replacement | Heavy Duty Upgrade |
|---|---|---|
Bushing Material | Basic Plastic / Nylon | Brass Inserts / High-Density Polymer |
Rod Thickness | Standard Gauge Steel | Thickened / Reinforced Steel |
Corrosion Resistance | Basic Paint Coating | Galvanized / Premium Powder Coat |
Best Application | Mild climates, personal use | Harsh winters, commercial fleets |
You face severe risks during the reassembly process. Never bolt the exterior arms down immediately. You must reset the motor to its true "park" position first. Plug the motor in without the rods attached. Turn the wipers on, then cycle them off. Let the motor stop completely on its own. Now, attach the new mechanism and the exterior arms. Skipping this crucial calibration step causes absolute disasters. The wipers might sweep right off the windshield glass. They could also crash downward forcefully and break your brand new mechanism.
Keep the entire cowl area perfectly clean before sealing it up. Remove all accumulated leaf litter. Scoop out hidden ice chunks or dense road debris. Foreign objects left behind can immediately bind the newly installed components. A clean operating environment extends the part lifespan significantly. Make sure no wire harnesses rub against the moving rods.
You must tighten every bolt correctly. Mechanics often rush this final step.
Overtightening: Using an impact gun will strip the soft aluminum arm splines instantly.
Under-tightening: Leaving the nut slightly loose leads to a recurrence of the single-moving-wiper symptom.
Best Practice: Always use a calibrated torque wrench. Follow the exact factory guidelines for the pivot nuts. Press the arm down firmly while tightening to seat the spline properly.
Accurate evaluations require a highly systematic approach. You must separate mechanical friction from electrical failure using isolation testing. A thorough visual inspection prevents costly and unnecessary parts swapping. Check the simple retaining nuts before assuming total system failure. Listen for grinding noises to confirm worn bushings.
Confirm the exact failure point first. Once confirmed, assess your daily operational demands carefully. Decide between standard aftermarket parts or rugged upgrades based on your climate. Always source your parts only after completing the testing phases. Finally, strictly follow all alignment calibration and torque guidelines during installation. Doing so guarantees safe driving visibility for years to come.
A: This is almost exclusively a mechanical separation. It is typically caused by either a loose retaining nut at the base of the non-moving arm or a popped ball-joint/bushing on that specific side of the wiper linkage. Inspect the nut first.
A: If you can hear the motor running clearly but the wipers aren't moving, the linkage is likely disconnected or broken. If there is absolutely no sound and no movement, suspect the motor, a blown fuse, or a bad relay.
A: No. A failing linkage can separate completely at any moment under normal wind load. This results in an immediate loss of visibility during bad weather. It creates a severe safety risk and a major legal/compliance hazard.


