Views: 0 Author: Site Editor Publish Time: 2026-06-08 Origin: Site


A malfunctioning windshield wiper system severely limits visibility. This creates significant driving hazards during sudden rain or snow storms. Most drivers default to replacing just the rubber blade when streaks appear. However, persistent issues like chattering, skipped sections, or complete loss of movement often stem from a failing wiper arm. Ignoring the underlying structural problem severely compromises your safety on the road. Replacing only the rubber component will not fix a weak spring or damaged hinge.
This guide details how to assess the health of your overall wiper system. We will show you how to verify correct fitment before purchasing parts. You will learn how to execute a safe, professional-grade replacement using this comprehensive installation guide. We prioritize safety, correct tooling, and verifiable testing. Pragmatic vehicle owners will appreciate this structurally sound approach to auto maintenance.
System Diagnostics: Differentiate between routine blade wear (streaking) and structural arm failure (loss of spring tension, stripped splines).
Compatibility Matters: Wiper arms are rarely universal. Matching OEM specifications and understanding your vehicle's specific connection type (Spline, Bolt-on, or Clip-on) is mandatory.
Risk Mitigation: A bare, spring-loaded wiper arm can easily shatter a windshield if it snaps back. Protective measures are non-negotiable.
Validation: Proper installation requires verifying downforce tension and executing a wet-windshield operational test.
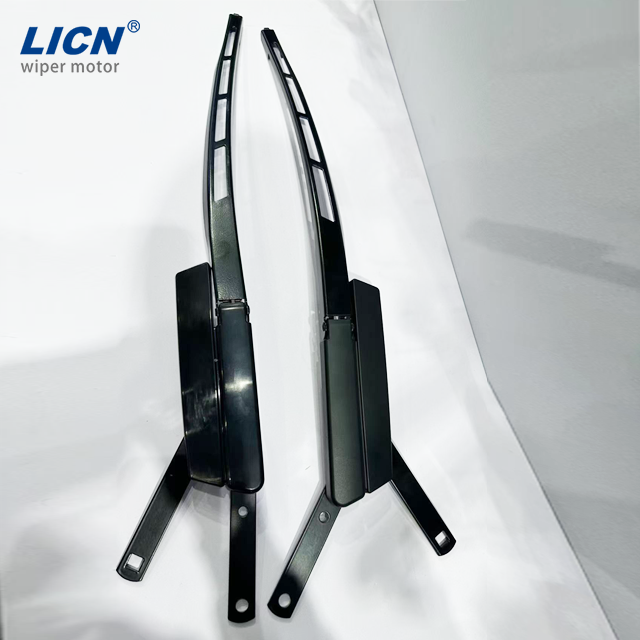
You must understand the functional differences between components before starting repairs. The wiper arm is a sturdy metal structure. It connects directly to the vehicle linkage. It features a pivot hinge and a strong tension spring. The wiper blade is the replaceable rubber squeegee attached at the end. Together, they form the complete assembly. Each part exhibits distinct failure symptoms when it begins to break down.
Smearing, squeaking, and torn rubber usually indicate basic blade wear. Ultraviolet rays degrade the rubber over time. Road debris causes micro-tears along the delicate squeegee edge. You should replace wiper blades every 6 to 12 months. Routine maintenance prevents permanent scratches on your windshield glass. However, installing a fresh blade will not fix a structurally compromised wiper arm.
A failing wiper arm presents far more severe symptoms. Sometimes the wiper motor runs smoothly, but the arm remains stationary. This specific symptom indicates stripped splines at the base pivot point. The internal metal teeth have worn away entirely. The motor shaft spins freely inside the broken arm. Another critical symptom involves un-cleared patches on the windshield. A brand-new blade will skip sections if the arm spring is weak. Stretched or rusted tension springs cannot pull the blade flat against curved glass. You might also observe severe corrosion or physically bent hinges from heavy snow accumulation.
Certain situations demand professional intervention. If the wiper arm jumps teeth erratically, stop immediately. If it binds completely during a cycle, do not force it. The hidden wiper transmission linkage may be failing. The step-motor actuator itself could be binding internally. These deeply embedded mechanical issues require professional diagnostic tools to fix safely.
Diagnostic Chart: Blade vs. Arm Failure | |||
Component | Common Failure Symptoms | Primary Cause | Typical Lifespan |
|---|---|---|---|
Wiper Blade | Smearing, squeaking, torn rubber strips | UV degradation, friction, road debris | 6 to 12 Months |
Wiper Arm | Stationary base, missed glass patches, no tension | Stripped splines, rusted springs, bent hinges | 5 to 10 Years |
Wiper Motor | Erratic jumping, complete binding, burning smell | Burnt electrical coils, broken transmission linkage | Vehicle Lifetime |
Finding the correct replacement part requires precise research. Wiper arms are structurally specific to the make, model, and year. You must emphasize vehicle compatibility before purchasing any components. Using cheap universal aftermarket arms carries significant risks. They often apply incorrect spring tension to the glass. Incorrect tension leads to premature wiper blade degradation. They might also interfere with the hood opening mechanism. Exact OEM replacements guarantee proper fitment and safe driving operation.
Automakers use three primary wiper arm base connections to secure the arm to the vehicle body. You must identify your type before starting the teardown process.
Splined Shaft and Nut: This is the most common configuration worldwide. A threaded post features vertical grooves called splines. The arm slides over these splines. A retaining nut secures it down firmly under a protective plastic cap.
Bolt-On Connections: Many classic cars use this method. Heavy-duty commercial trucks also favor bolt-on designs. Two distinct bolts hold the arm base flat against a mounting plate.
Clip-On Interfaces: Specific European models use sliding clip-on bases. A hidden tension tab locks the arm over a smooth pivot shaft. You must depress the tab with a specialized tool to release it.
You must also understand blade interface types. The blade interface connects the rubber squeegee to the metal arm. Knowing your style ensures seamless assembly.
J-Hook: The metal arm curves back on itself like a letter J. The blade slides inside the hook and clicks into a plastic retaining clip.
Push-Button: A small square button sits on top of the blade adapter. You press the button down to slide the blade off the straight metal arm.
Pinch Tab: You squeeze two plastic tabs together on the blade adapter. This releases the internal lock, allowing you to pull the blade away from the arm.
Sometimes you need to verify the exact size of a replacement arm. Measure the straight-line distance carefully. Start from the center of the base pivot point. Measure directly to the center of the blade attachment joint. This standardized measurement prevents costly ordering mistakes.
Proper preparation separates a frustrating ordeal from a professional-grade repair. Gather all necessary tools before opening the vehicle hood. You do not want to leave the windshield unprotected while searching for a wrench. Having the correct chemical fluids will save you immense physical effort later.
Use this comprehensive material and tool checklist to prepare your workspace:
Socket wrench set: You need various metric sockets to remove the base retaining nut.
Flathead screwdriver: Use a thin-bladed screwdriver to carefully pry off the protective plastic base cap.
Wiper arm puller tool: This small clamp is absolutely crucial. It safely lifts arms fused by galvanic corrosion without damaging the cowl.
Penetrating fluid: Keep a can of WD-40 or PB Blaster nearby. You will need it to dissolve stubborn rust around the splines.
Wire brush: A stiff metal brush helps clean oxidized debris from the actuator shaft.
Anti-seize grease: A small packet prevents future corrosion from permanently fusing the new parts together.
We must discuss a crucial safety protocol known as "The Towel Trick." A bare, spring-loaded wiper arm poses a massive threat to your windshield. It can easily shatter the glass if it snaps back suddenly. Protective measures are strictly non-negotiable. Place a thick folded towel directly on the windshield glass. Position it directly beneath the wiper pivot area. You can also use a heavy moving blanket for extra coverage. This simple barrier absorbs catastrophic impacts if your grip slips during removal. Never skip this vital safety step.
Patience and precision dictate the success of this repair project. Follow these detailed steps to remove the damaged components and successfully install the new Wiper Arm & Blade. Do not rush the rust removal phase. Forcing corroded parts will destroy the internal vehicle linkages.
Relieve Tension and Remove the Cap: Start by lifting the wiper arm upwards until it locks at a 90-degree angle. This action relieves all heavy spring tension from the base joint. Take your flathead screwdriver next. Carefully pry off the protective plastic base cap. Set the cap aside to expose the underlying retaining nut.
Extract the Old Wiper Arm: Select the correct socket size and loosen the retaining nut completely. Pull the nut off and place it somewhere safe. Try wiggling the arm gently. If the arm is seized tightly onto the splines, stop pulling. Avoid aggressive prying against the delicate plastic cowl. Apply a generous burst of penetrating fluid directly onto the splines. Wait exactly 10 minutes for the fluid to penetrate the rust. Attach your dedicated wiper arm puller tool. Tighten the puller slowly to safely lift the arm straight off the splined shaft.
Clean and Prep the Base: Inspect the exposed splined actuator shaft. It likely harbors significant rust and road grime. Use your wire brush to scrub away all loose debris. Clean the tiny vertical grooves thoroughly. Apply a very light coat of anti-seize grease directly to the metal splines. This vital step ensures future serviceability and prevents galvanic corrosion.
Align and Install the New Arm: Position the new metal arm carefully. Align it parallel to the visible resting line on your windshield glass. Many windshields feature small black alignment dots in the glass frit. Press the arm firmly down onto the greased splines. Thread the retaining nut back onto the shaft by hand. Torque the nut down to the exact manufacturer specification using your socket wrench. Snap the protective plastic cap back into place.
Attach the New Wiper Blade: Carefully lower the bare metal arm toward the protective towel. Pick up your new rubber blade. Slide or snap the blade adapter into the arm's attachment point. You must listen closely for an audible "click" sound. This sound confirms a fully locked J-Hook or Pinch Tab. Finally, remember to remove the brightly colored plastic protective sleeve from the new rubber edge.
Installation is only half of the job. You must validate the mechanical integrity of your repair before driving in poor weather. Skipping the testing phase can result in sudden wiper failure on the highway.
Start with the "Dollar Bill Test" to check spring tension. Lift the wiper blade slightly. Slide a crisp paper bill between the rubber edge and the windshield glass. Let the arm rest back down naturally. Grab the bill and pull it straight out. If you feel distinct, heavy resistance, the installation is successful. The new arm's internal spring is applying correct, safe downforce. If the bill slips out without friction, the arm is defective or improperly seated.
Next, perform a comprehensive wet operational test. Never test new wipers on a completely dry windshield. Dry glass creates immense friction. This friction causes micro-scratches on the glass and premature rubber wear. Sit inside the vehicle and turn the ignition on. Spray a generous amount of windshield washer fluid onto the glass. Cycle the wipers through their low, high, and intermittent speed settings.
Watch the motion carefully from the driver's seat. Look for smooth, consistent arcs across the entire glass surface. Step outside the vehicle while they run on low speed. Observe the base pivot joint. You should see zero play or wobble at the splined connection. Listen closely for any harsh, metal-on-metal noise. Smooth, silent operation confirms a professional-grade assembly repair.
Successfully replacing a compromised wiper arm and blade is a straightforward, highly rewarding process. Armed with the right tools and exact compatibility data, you can restore perfect visibility safely. Strict adherence to glass-protection measures ensures you avoid costly secondary damages.
Start your repair journey by identifying your exact failure symptoms today. Promptly look up your specific vehicle make, model, and year in a trusted OEM parts database. Source the exact arm length and interface type before opening your hood. Always test your final assembly thoroughly to guarantee maximum road safety during the next storm.
A: Expect to pay between $50 and $100 per side for the physical parts. This range depends heavily on whether you choose cheap aftermarket options or high-quality OEM replacements. Labor costs will add an additional $50 to $80 if you have a professional shop perform the installation.
A: Wiper blades are standard consumable parts lasting only 6 to 12 months. Wiper arms are structural metal components. They typically last 5 to 10 years. However, heavy road salt usage and harsh winter climates can rapidly accelerate spring corrosion, reducing their lifespan.
A: The internal splines on the inside of the wiper arm base have likely stripped out completely. This mechanical failure severs the physical connection to the motor's spinning actuator shaft. The damaged arm cannot be repaired and must be fully replaced.


